


Main Bathroom DIY
AKA Our Pandemic Project
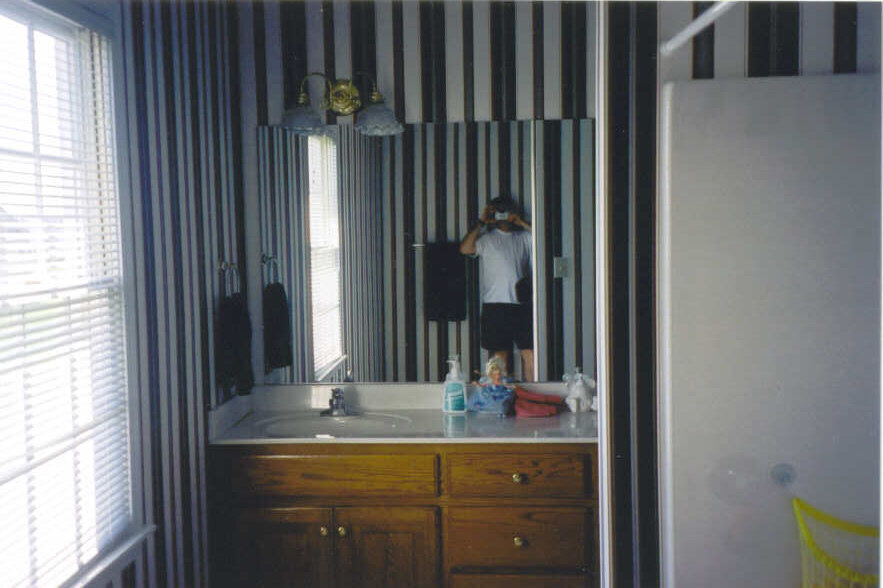
BEFORE

AFTER
We bought our house in 2003.
It was quite a step up for us in the size of house, which was exciting for us. We also moved into a more established neighborhood in the school district we wanted. There were a lot of things I liked about this house that was built in 1995 and a lot of things I didn’t like very much.
For starters, every bathroom and the kitchen had outdated wallpaper. Think of the 90s in their heyday kind of wallpaper. Every room that had wallpaper was in the family of hunter green, teal and burgundy. My daughter’s bathroom even combined hunter green and burgundy into a faux “sponge-painted” mélange which was super ugly. Oh, it was hideous! Our house has 3-½ baths, so that’s a whole lot of wallpaper.
We could not afford to pay someone to remove the wallpaper, so I started doing it myself.....one bathroom at a time. The contractor that built our house did not take the time to do things right when the house was built. The builder put the wallpaper right on the drywall without properly prepping the walls, so getting the wallpaper off was a very slow and painful process. The wallpaper came off in one tiny dime-sized piece at at time and the paper backing stayed behind so you guessed it, double work. The previous homeowner had given up on removing the kitchen wallpaper and had just painted over it. The kiss of death in my opinion – there's no going back. You can always see the seams and the paint can reactivate the glue and cause bubbling. Kiss…of…death.

We have taken each bathroom through phases of updates over the years. Pictured here is the way it looked when we moved in.
This is our main upstairs bathroom and it is pretty roomy for a bathroom. I remember the first time we walked in to tour the house....I walked in and turned left, cool a double vanity....then I turned left again....cool a nice big shower....then I turned left again....and there was the toilet. The room was ginormous!
I’d say this bathroom had the least offensive wallpaper even though it was still pretty ugly. It was a more classic stripe, still incorporating the beloved greens, golds and burgundies of that time frame. And for that reason, it is the last one that I tackled. I worked on it for a while and ended up giving up and calling in a professional.
There was a lot of prep work that needed to be done between taking down the wallpaper and painting the room, a lot of spackling, sanding and smoothing that needed to happen to prep those walls. I hired someone and was at work basking in the glow that I had a guy working on this project for me. I was excited to get home and see the result, but before I left my office, the guy texted me that he was finished. He acted like he had to be somewhere pretty quickly and so we agreed to meet in a convenience store parking lot for me to pay him. Are ya’ll seeing all the red flags here? How could I have been so naïve and stupid?! Well, I trusted him. I trusted when I got home it would be fabulous. He had done a few other successful projects for us. Live and learn people.
When I got home and walked in expecting to be blown away, I realized the “professional” had skipped all of the crucial prep work. He had painted over the holes and flaws in the drywall and rough patches - no prep work like I was expecting. And, to add insult to injury, the paint store had changed their formula of the eggshell sheen I chose, and it leaned much shinier than I was planning or wanted. It ended up highlighting every......single.....flaw. And, let me tell you, the flaws were everywhere!

This was our first stage of renovation…redoing the walls, cabinets, and adding new decor. I was trying out a rug in that photo and it was a no – too much. That is one of the only photos I could find of the whole bathroom – too bad I didn’t bother to clean off the counter first. Ha!
The flaws in the wall really upset me every time I spent any time in this bathroom. But I was determined that we would eventually have a beautiful bathroom. It took 10 years to have the time and money saved to tackle this large bathroom. We were also in the throes of raising teenagers during those 10 years and the last thing we would have wanted to do is make our children share a bathroom when they didn’t have to! Ha! We chose peace and harmony over fixing those flaws.
Here are a few more before photos.


Uhm, could I have maybe moved that hanger off the counter first or my son’s stack of boxes from his first apartment? 😅
This is our third bathroom renovation to date. We learn more each time and have gotten better and more efficient with each project. We were able to upgrade this bathroom for around $3,000.
One of the ways we’ve tried to combat the damaged drywall is by covering a good portion of it with beadboard paneling. We have installed it to about shoulder height (around 48”) in each of the bathrooms. This has created a clean, cohesive look. Each bathroom is a little different though and has its own vibe. Since the main bathroom is visible when climbing the stairs to the second floor, it was important to me that I loved it every single time I climb those stairs.
Okay, queue the romantic music here....if my heart could sing in a paint, it would be Aura Interior in matte finish by Benjamin Moore. We used Aura Bath and Spa Paint in matte finish for this bathroom. We’ve used Aura in matte finish in every room that we have renovated. When you open the can, it’s rich and creamy. It goes on smoothly and has little to no sheen. It is wipeable and washable and never looks chalky like flat paint. It holds up! It’s a win-win in every room. We used it in our kitchen renovation 9 years ago and I’ve had to wipe off many spills and scuffs over the years and it still looks great. I love it and highly recommend it if you are going to repaint a room. It’s not the cheapest paint and not the most expensive but I think it’s worth the extra money for a premium product that stands the test of time.

There are times when painter’s tape is crucial though and for those times, I use frog tape. I’ve used the blue frog tape, but the green is superior in every way. In my experience, the blue tends to tear off and leave little bits that you have to go back and try to get off with an exacto knife. The green frog tape does not do that. It’s my favorite and we always have some on hand for our projects.

For roller sleeves, I’m usually looking for ones that do not shed and have a little more nap since our walls are not perfectly smooth. I like these.

Another little favorite tip of mine is that whenever I need to stop in the middle of a paint project, I cover my brush, roller sleeve and paint tray with Glad Press ‘n Seal plastic wrap. That way, you can go and take a lunch break or even come back to it the next day and it’s still usable. I do this with my oil-based paint too, but it will not last as long as acrylic. It will start getting gummy on you if it’s more than an hour or so. If I’m finished for the day, I clean my brush with mineral spirits.

My very favorite brush to cut in around the ceiling and trim is this one. The short handle keeps my hand from getting as tired and the angle helps me to get a straight, smooth edge without using painter's tape.
We had all of the main living areas of the house painted in the fall of 2019. We were stuck in the early 2000s era of gold walls and I was desperate for an update. When the rest of the house was painted, I asked the guy to paint this bathroom. We used a new painter that was recommended by one of my friends that flips houses. At the time, we weren’t exactly sure when we would renovate the bathroom, but I wanted the walls repaired and the high sheen paint gone.
So, you may notice in some of the photos that the lighter color we started with isn’t the final color. There just wasn’t enough contrast for me so I custom mixed two paint colors to get the final color. I mixed Weathered Shingle and Accessible Beige to get this rich neutral shade. I think the final color is amazing. Both colors are Sherwin Williams paint colors, but I had them custom mixed with Benjamin Moore paint in my favorite Aura Matte paint.
We kept the oak vanity because it is well-made and of high quality. As you can see in the first picture, it was that orangey oak that was all the rage back in the 90s. (Why? Who decided that was a good idea?) In our first phase renovation which was mainly just cosmetic, we had the room painted a beautiful milk chocolate brown. I painted the vanity with a product called Cabinet Transformations by Rust-Oleum and it was a fairly easy process to make it this beautiful espresso brown. Just follow their step-by-step instructions and you’ve got yourself a brand new cabinet! There was a very large mirror that covered the entire expanse above the double vanity but it was glued to the wallpaper and so when the wallpaper came down, so did the mirror. Since we were doing a very low budget re-do, I bought two good-size mirrors from TJ Maxx for about $25 each so there was a mirror over each sink. Total cost on phase 1 was less than $500. ($300 was for the crappy paint job – oh it still makes me mad!)
I really missed that big mirror in there though. I could give my kids and husband haircuts in this bathroom and with the large mirror I could easily see everything. With the two mirrors, everything felt a little stifled. I think the natural light from the window bounced off the big mirror and just made it a happier, brighter place. So, one of the first things on my list in the phase 2 renovation was to find one large mirror to cover both sinks.
This turned out to be one of the more challenging parts of this renovation. I wanted the mirror to be special so a stock, frameless builder-grade mirror just wasn’t going to do. I shopped and shopped for a mirror for months. I finally found one the perfect size from Ballard Designs. You can find it here. It is a leaning mirror but had hardware to hang it. Or, let me say, that I was assured that it had hardware to hang it vertically and horizontally. When the mirror arrived, it could only be hung vertically. Ballard Designs was great about all of this I must say. They said they’d let me return the mirror and not charge the freight fee if I could not find a way for it to work for me. I called in a glass company that was going to be my fail-safe if I could not find a fancy mirror. The gentleman that came out had been hanging mirrors for over 30 years and he came up with a system to make it work! It was creative and innovative, and he let me approve it every step of the way. We were back on top! Fortunately, I got the mirror on sale so having to pay a professional to install it did not hurt quite as much.

You can really get a sense of the scale of this mirror here!
The first step in any project is to have a plan in mind. We knew installing beadboard was going to make this project more difficult and take a whole lot longer to finish. At the same time, we knew that it would look nice and be cohesive with the rest of the house. My favorite way to start a project is by gathering photos of styles of bathrooms that I like on a new pinterest board. If I’m at a friend’s house and like their bathroom light, I take a photo and add it to my pinterest board. It may be something small, like an accessory or a feeling, but I like to have it in one place so that I can stay focused on the direction I want the room to travel. I also take photos of light fixtures, granite, faucets, etc. and add them to that pinterest board. By the time we are done with the labor portion of the project, I’ve got a pretty good idea of what else I need to buy to finish the room.
We started with removing the mirrors, towel rings and bars, shower rod, toilet paper holder, the toilet, countertop and switch plates. Sometimes the demolition is my favorite part! It’s fun to get started and to take the bathroom to a state of being a blank canvas. One little trick we’ve learned over the years is to cover the toilet drain and sink pipes. You’ve got to be careful with this though. We again used our handy dandy Press ‘n Seal to cover the drain and pipes. This allows for a little air movement but not enough movement to smell the drain. Very important though – make sure to remove it before installing the new toilet. Otherwise, you’re going to have a huge plumbing problem. I’m fortunate in that my husband is pretty handy and can do most of these parts of the projects. I wouldn’t know where to start on my own. We’ve learned that we each have our areas of expertise and so we don’t mind switching roles as captain and first mate. We are a very good team!
So, like I said, the beadboard took a while. We calculated how many sheets of beadboard we needed and had them delivered. We removed the baseboards and quarter round and threw them away. We learned from previous projects that it just doesn’t work out to use the same pieces. The boards are brittle after 25 years and they break and split when being removed. We’ve realized that the builder of our house used smaller baseboards upstairs than down. I’m assuming that was another way to save a buck. We like the look of larger, lusher trims so we replaced them with new. Also, when you’re adding beadboard and flooring, the cuts will not meet up on the angles of the trim like you want so it is best to start fresh. My husband is handy with a saw and understands how to miter cuts. I’m good at measuring so I usually do the measuring and he does the cutting. We installed the beadboard during the quarantine. It gave us a project to focus on instead of the fact the world was on fire. Fortunately, we had all of the supplies we needed for this phase of the project.
We had already picked out our granite, so as soon as the restrictions were lifted, we had the granite company come out and install the granite. We chose the most neutral granite we could find. I always ask to bring a few samples home so I can see it in the room and in our lighting. I really love the look of marble and kept gravitating towards it when we were shopping for the vanity countertop. In the end, I decided to keep it cohesive with the rest of the house. We needed a tough material with less maintenance to fit our lifestyle and to be able to withstand the ruggedness of the McKinneys.
I chose simple light fixtures and hardware from Pottery Barn. I wanted to mix my metals a little with this bathroom to create a look that wasn’t too match-y but was also very clean and classic. The frame of the mirror is an oil rubbed bronze metal frame. I chose hardware from Restoration Hardware for the vanity. I love big, bodacious hardware. It makes a statement. I am also very blessed to have a sister who is a fabulous interior designer. I ran these choices by her to make sure I wasn’t screwing up before I bought everything. And because she’s awesome and loves me, she used her drafting program to calculate out exactly what height we needed to hang our lights. This was crucial because the glass company didn’t want us to hang the lights before they hung the mirror. The space was already very limited from side to side, so they wanted as much space vertically as they could have to work with to hang the massive mirror. We also needed to move the location of the lights a little. They were too low and we wanted them higher. We needed to cut the holes in the drywall and patch and paint everything before the mirror was hung.


We also replaced the vinyl with a luxury vinyl plank flooring that is waterproof and looks like wood. This flooring is great for bathrooms because it is waterproof, easy to install and easy to clean. All you have to do is read the instructions and look up a few YouTube videos and it’s a piece of cake! Don’t you just love instructional YouTube videos? I once repaired a Bissell carpet cleaner by watching a YouTube video – now I felt like a real pro that day! Ha! I’ve also got a stubborn streak and was determined to get that carpet clean!
The trickiest part of using the vinyl planks is the transition piece at the threshold. The planks we used were purchased at Home Depot. The color we chose is Java Hickory. You can find it here. The threshold piece for this type of vinyl flooring is not attractive and when I say that I’m being really nice. It may work in some scenarios, but it would not work in our house. It looks plastic-y and just did not make a good transition between the bathroom and the hallway carpet. It made the whole project look cheap and that is SO not the look we were going for here. This flooring is a floating floor so you cannot staple the carpet to it. So, we handled this by cutting a piece of wood the width of the doorframe and stapling the carpet to it. Then the vinyl flooring is under the carpet, but not attached to it in any way so it can expand and contract, as needed.
One other little tip for this, we used a bead of clear silicone caulk around the entire outside perimeter of the room, including the tub and toilet, before putting the quarter round back down. It does not touch the vinyl flooring at all, but it acts as another layer of protection against water and also keeps the floor from shifting too much.


That same vanity that has gone through being an orange mess, to an espresso beauty, is now a lovely, creamy white. I went back and forth on whether I wanted the vanity to be dark or light. Once we had the granite in and I put a few pieces of the flooring next to the vanity, I knew I wanted the creamy white.

We really love the contrast between the dark floor and the white cabinet.
The process for painting the cabinet was pretty simple. We removed the drawers, doors and hardware. I lightly sanded the base, drawers, and doors just to rough up the finish and then wiped them down with vinegar to remove any residue and clean the surface. I then applied Kilz primer and then we were ready to go. Two coats of oil-based paint and we were done.
Now, we ran into some really frustrating problems towards the end. We were using a semi-gloss finish for the trim and vanity and a satin for the beadboard. We got our paint cans confused and ended up painting a big portion of the beadboard with the semi-gloss paint. (When I say “we,” you may be able to guess which one of us got froggy and decided to paint one day when I wasn’t home.) My husband absolutely loved it, but it felt like a room of mirrors to me. So we sanded again and fixed that little problem. I had to hide the can of semi-gloss paint from him so that didn’t happen again. He’s a retired Army guy – spit, shine, and polish = good! 😊


Once we had all of the major things done in the bathroom, we were able to reinstall the toilet, install the beautiful Delta faucets, the towel rings, cabinet hardware, shower rod and towel hooks. There are still some final touches that need to happen, so I will follow up with ya’ll once the room is completely styled. We are very pleased with how this bathroom turned out. And I love it absolutely every time I come up those stairs. It was a great project to tackle during the pandemic.
Now as soon as my family can travel again, we are ready for guests!

Get into the Details


